Tuesday, March 23, 2021

Centos 7.9, You don't have permission to access /phpmyadmin/ on this server.


Edit file phpMyAdmin.conf

sudo vi /etc/httpd/conf.d/phpMyAdmin.conf

And replace the existing <Directory> ... </Directory> node with the following:

<Directory /usr/share/phpMyAdmin/>
   AddDefaultCharset UTF-8

   <IfModule mod_authz_core.c>
     # Apache 2.4
     <RequireAny>
       #Require ip 127.0.0.1
       #Require ip ::1
       Require all granted
     </RequireAny>
   </IfModule>
   <IfModule !mod_authz_core.c>
     # Apache 2.2
     Order Deny,Allow
     Deny from All
     Allow from 127.0.0.1
     Allow from ::1
   </IfModule>
</Directory>

Monday, March 22, 2021

PHP: mysqli_connect(): Headers and client library minor version mismatch


PHP Warning:  mysqli_connect(): Headers and client library minor version mismatch. Headers:50550 Library:50631 in /var/www/html/web_app/test/browser/dbconn.php on line 31

After researching online, I came to know that I would need to remove the following version of MySQL driver php-mysql and install php-mysqlnd  I did the following and got the following results:

Removal Step :

[root@target1 phpMyAdmin]# yum remove php-mysql
Loaded plugins: fastestmirror, langpacks
Resolving Dependencies
--> Running transaction check
---> Package php-mysql.x86_64 0:5.4.16-48.el7 will be erased
--> Processing Dependency: php-mysqli >= 5.3.7 for package: phpMyAdmin-4.4.15.10-4.el7.noarch
--> Running transaction check
---> Package phpMyAdmin.noarch 0:4.4.15.10-4.el7 will be erased
--> Finished Dependency Resolution

Installation step:

[root@target1 phpMyAdmin]# yum install php-mysqlnd
Loaded plugins: fastestmirror, langpacks
Loading mirror speeds from cached hostfile
 * base: mirror.es.its.nyu.edu
 * epel: dl.fedoraproject.org
 * extras: mirror.es.its.nyu.edu
 * updates: mirror.ette.biz
Resolving Dependencies
--> Running transaction check
---> Package php-mysqlnd.x86_64 0:5.4.16-48.el7 will be installed
--> Finished Dependency Resolution

Wednesday, October 7, 2020

How to Install Homebrew on Mac

 source: https://osxdaily.com/2018/03/07/how-install-homebrew-mac-os/


Advanced Mac users may appreciate using the Homebrew package manager, which greatly simplifies the process of installing command line software and tools on a Mac.

For example, if you want to easily install favorite command line tools on a Mac like cask, htop, wget, nmap, tree, irssi, links, colordiff, or virtually any other familiar unix command line utility, you can do so with a simple command. Homebrew downloads and builds the package for you.


This is obviously aimed at more technically savvy Mac users who spend a lot of time at the command line. While there’s no particular issue for novice users installing Homebrew on their Mac, the odds of novices finding it useful are slim, unless they intend to embark on learning the command line environment. Contrast that to power users who practically live in a terminal environment, whether longtime Mac users or migrating to the platform from the Windows or Linux world, who will immediately see the value of Homebrew.

Requirements for Installing Homebrew on Mac OS

prerequisites to installing Homebrew on a Mac include the following:

  • A Mac running Mac OS X 10.10 or later, though earlier versions are sort of supported
  • Command Line Tools must be installed on the Mac (either independently or through Xcode)
  • Knowledge of the command line and using bash or zsh

Assuming you’re interested in installing Homebrew and meet those requirements, then the rest is equally straight forward.

How to Install Homebrew on Mac OS

The simplest way to install Homebrew is through ruby and curl, accomplished with a single command. This approach is the same for installing Homebrew in all supported versions of Mac OS and Mac OS X.

  1. Open the “Terminal” application, found in /Applications/Utilities/
  2. Enter the following command into a single line of the terminal:
  3. For MacOS Catalina, macOS Mojave, and MacOS Big Sur:
    /bin/bash -c "$(curl -fsSL https://raw.githubusercontent.com/Homebrew/install/master/install.sh)"

    For macOS High Sierra, Sierra, El Capitan, and earlier:
    /usr/bin/ruby -e "$(curl -fsSL https://raw.githubusercontent.com/Homebrew/install/master/install)"
    Installing Homebrew on Mac

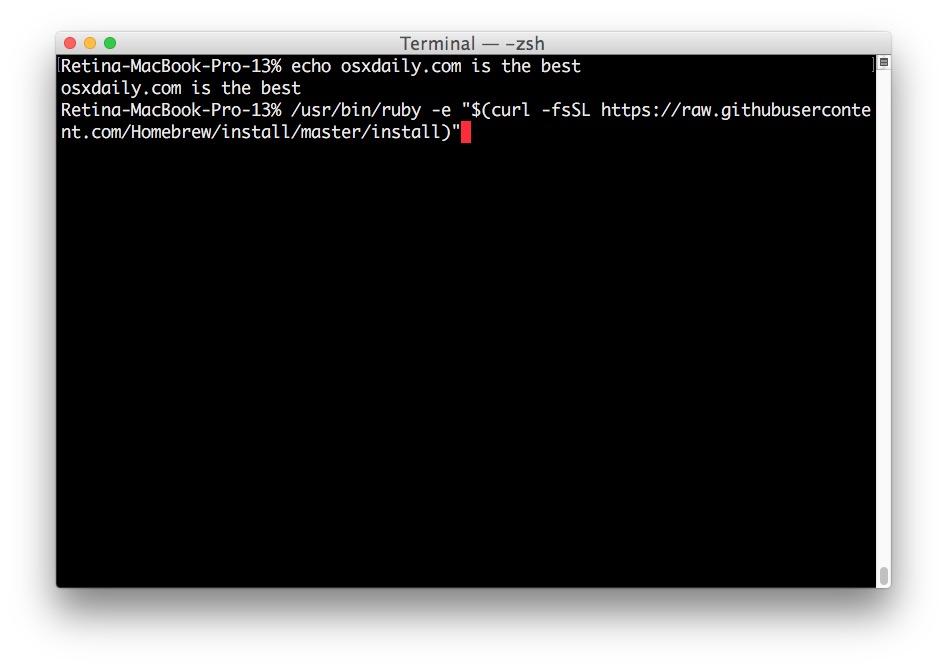
  4. Hit Return and you’ll see a series of lines about what the script will install and where, hit Return again to agree or hit Escape to cancel
  5. Enter the administrator password (required by sudo execution) to begin installation

Installation of Homebrew will take a while depending on the speed of your Mac and internet connection, as each necessary package is downloaded and installed by the script.

When complete, you will see an “Installation successful!” message.

Homebrew successfully installed on Mac

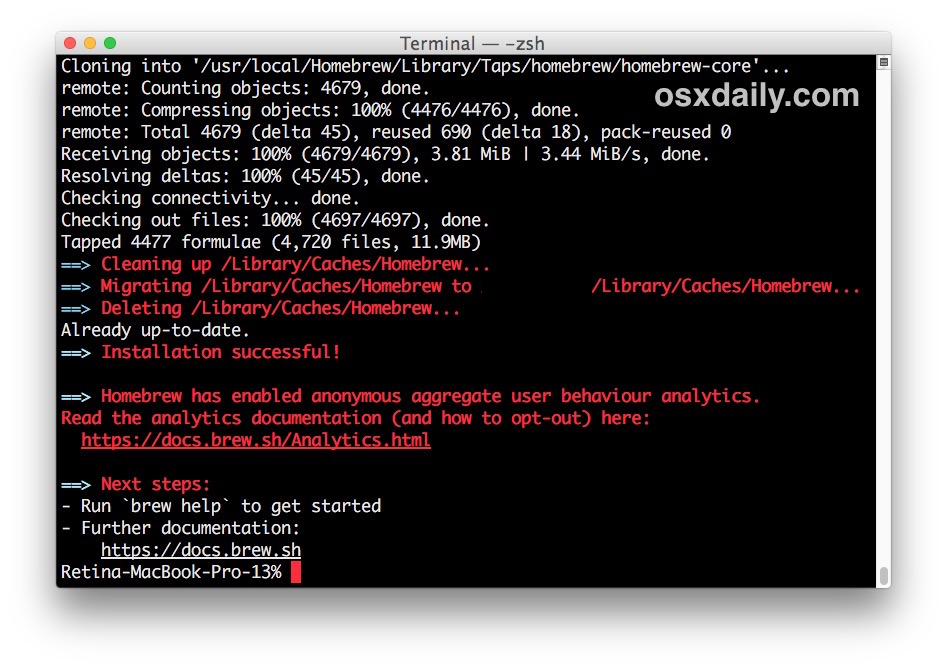
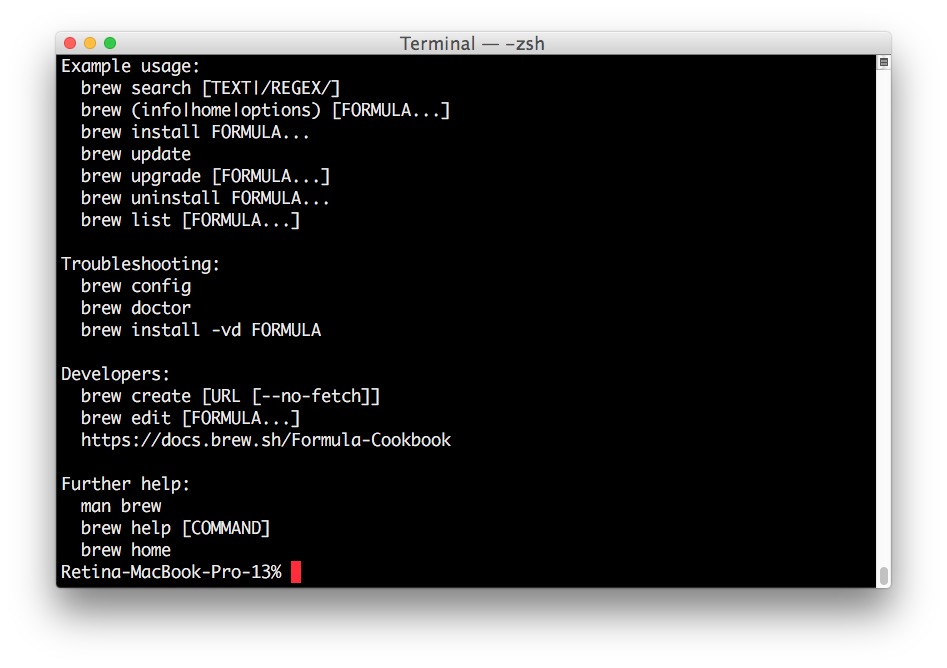
Now you’re ready to install software packages through Homebrew, or you can read the help documentation with the following command:

brew help

Homebrew help on Mac

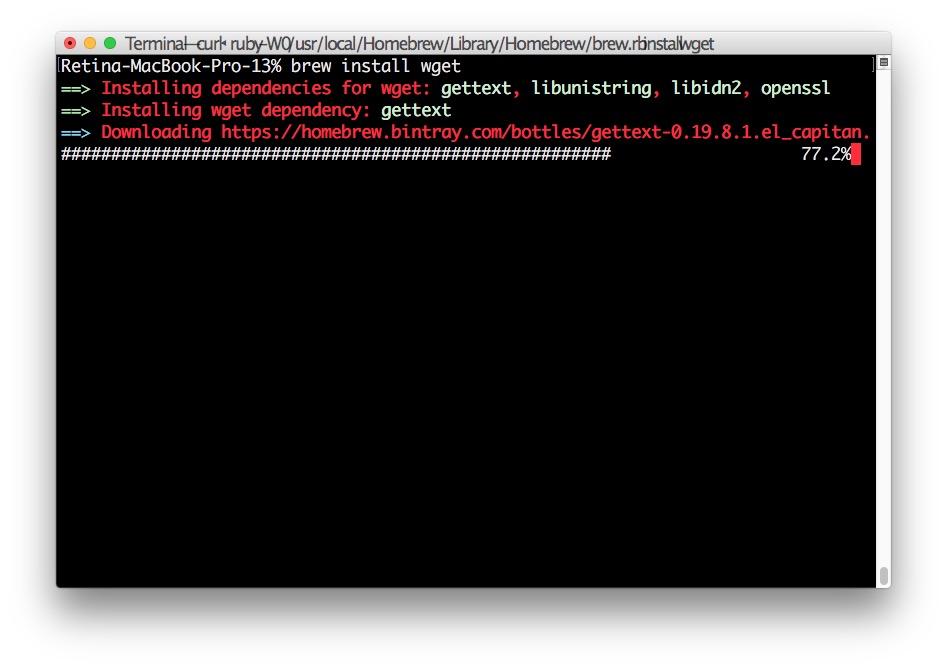
Installing Software Packages through Homebrew on Mac

Installing packages with Homebrew is super easy, just use the following syntax:

brew install [package name]

For example, to install wget through Homebrew you could use the following syntax:

brew install wget

Simple, easy. Once complete you can run wget as usual.

Installing a package with Homebrew on Mac

A quick side note; Homebrew is not the only way to install command line software, you can install command line tools on a Mac yourself and then compile and make software independently. For example, we discuss installing wget on Mac OS without Homebrew here and it uses the typical configure and make process. There’s nothing wrong with that approach (and arguably it might be preferable for users who want limited packages and a slimmer footprint) but if you’re accustomed to a package manager like dpkg, apt-get, or rpm you’ll almost certainly appreciate and prefer to use Homebrew.

How to Disable Homebrew Analytics Tracking

Homebrew now defaults to using anonymized behavioral analytics tracking. If you do not want to participate in that or you’d just rather disable the feature to reduce network traffic or for privacy purposes, or whatever other reason, you can run the following command after successfully installing Homebrew on a Mac. This will opt out of Homebrew analytics:

brew analytics off

Hit return and after a moment or so the analytics tracking in Homebrew will be disabled.

How to Remove HomeBrew from a Mac

If you have installed Homebrew but later decide you want to remove Homebrew from a Mac for some reason or another, you can uninstall it with another ruby script run from the command line, choose the script that aligns with your version of MacOS:

Removing Homebrew in MacOS Catalina, macOS Big Sur, and MacOS Mojave:

/bin/bash -c "$(curl -fsSL https://raw.githubusercontent.com/Homebrew/install/master/uninstall.sh)"

Removing Homebrew from MacOS High Sierra, Sierra, El Capitan, and earlier:
ruby -e "$(curl -fsSL https://raw.githubusercontent.com/Homebrew/install/master/uninstall)"

Alternatively, you could download that “uninstall” script directly and run it yourself.

Enjoy Homebrew!


Tuesday, November 15, 2016

How to fix “fatal error: openssl/aes.h: No such file or directory”

Question: I am trying to compile a program on Linux, but the compilation fails with an error saying: "fatal error: openssl/aes.h: No such file or directory". How can I install the requested header file and solve this problem on [insert your Linux distro]?
fatal error: openssl/aes.h: No such file or directory
If you encounter this error during compilation, this is because of the following: The program you are trying to build is using OpenSSL, but necessary development files (libraries and header files) required to link with OpenSSL are missing on your Linux platform.
To fix this problem, you have to install OpenSSL development package, which is available in standard repositories of all modern Linux distributions.
To install OpenSSL development package on Debian, Ubuntu or their derivatives:
$ sudo apt-get install libssl-dev
To install OpenSSL development package on Fedora, CentOS or RHEL:
$ sudo yum install openssl-devel
After installing the package, try recompiling the program.

source: http://ask.xmodulo.com/fix-fatal-error-openssl.html 

Redhat / CentOS / Fedora Linux Install XCache for PHP 5

How do I install Xcache opcode cacher for PHP 5 under RHEL / CentOS version 5.0 server?

XCache is a open-source opcode cacher, which means that it accelerates the performance of PHP on servers. It optimizes performance by removing the compilation time of PHP scripts by caching the compiled state of PHP scripts into the shm (RAM) and uses the compiled version straight from the RAM. This will increase the rate of page generation time by up to 5 times as it also optimizes many other aspects of php scripts and reduce serverload.

Step # 1: Download xcahce source code

Use wget command to download latest stable release:
# cd /opt
# wget http://xcache.lighttpd.net/pub/Releases/1.2.1/xcache-1.2.1.tar.gz

Step # 2: Untar tar ball

Use tar command:
# tar -zxvf xcache-1.2.1.tar.gz
# cd xcache-1.2.1

Step # 2: Compile and install xcahce

Use phpize command to prepare xcache as a PHP extension for compiling:
# phpize
Configure, compile and install xcache:
# ./configure --enable-xcache
# make
# make install

Default xcache.so installation location

  • 64 bit PHP module installed at /usr/lib64/php/modules/xcache.so
  • 32 bit PHP module installed at /usr/lib/php/modules/xcache.so

Step # 3: Create xcache.ini file

Under RHEL / CentOS, you place php modules configuration at /etc/php.d/ directory:
# cd /etc/php.d/
Create xcache.ini file:
# vi xcache.ini
Append configuration directives:
[xcache-common]
; change me - 64 bit php => /usr/lib64/php/modules/xcache.so
; 32 bit php => /usr/lib/php/modules/xcache.so 
zend_extension = /usr/lib64/php/modules/xcache.so

[xcache.admin]
xcache.admin.auth = On
xcache.admin.user = "mOo"
; xcache.admin.pass = md5($your_password)
xcache.admin.pass = ""

[xcache]
xcache.shm_scheme =        "mmap"
xcache.size  =               32M
xcache.count =                 1
xcache.slots =                8K
xcache.ttl   =              3600
xcache.gc_interval =         300

; Same as aboves but for variable cache
; If you don't know for sure that you need this, you probably don't
xcache.var_size  =            0M
xcache.var_count =             1
xcache.var_slots =            8K
xcache.var_ttl   =             0
xcache.var_maxttl   =          0
xcache.var_gc_interval =     300

; N/A for /dev/zero
xcache.readonly_protection = Off

xcache.mmap_path =    "/dev/zero"

xcache.cacher =               On
xcache.stat   =               On
Save and close the file.
Alternatively, you can also copy default xcache.ini to /etc/php.d/
# cp xcache.ini /etc/php.d/
# vi /etc/php.d/xcache.ini
Restart your Apache web server:
# service httpd restart
If you are using Lighttpd web server, enter:
# service lighttpd restart

Step # 4: Make sure xcache is working

Type the following command for verification:
$ php -v
Output:
PHP 5.1.6 (cli) (built: Nov 20 2007 11:11:52) 
Copyright (c) 1997-2006 The PHP Group
Zend Engine v2.1.0, Copyright (c) 1998-2006 Zend Technologies
    with XCache v1.2.1, Copyright (c) 2005-2007, by mOo
You should see line “XCache v1.2.1, Copyright (c) 2005-2007, by mOo

Friday, October 7, 2016

"Network error: Software caused connection abort"


I had the same issue, which was caused by incorrectly generated SSH keys (during first boot). Check this by opening a terminal and going into the /etc/ssh directory. You will see a bunch of files, 6 of them looking like 'ssh_host_###_key'. If these are 0 bytes in size, you are affected by this as well. Follow these steps to fix the issue:

First, remove the old keys:
Code:
rm /etc/ssh/ssh_host_*_key*

Now generate new ones. The command will ask you to set a passphrase or press enter to continue. Do not set a passphrase!
Code:
ssh-keygen -t dsa -f /etc/ssh/ssh_host_dsa_key
Code:
ssh-keygen -t rsa -f /etc/ssh/ssh_host_rsa_key
Code:
ssh-keygen -t ecdsa -f /etc/ssh_host_ecdsa_key

Restart your SSH service (or reboot). You can now log in again.

Code:
service ssh restart
FIND

Monday, January 11, 2016

How to determine total number of open/active connections in ms sql server 2005

This shows the number of connections per each DB:
SELECT 
    DB_NAME(dbid) as DBName, 
    COUNT(dbid) as NumberOfConnections,
    loginame as LoginName
FROM
    sys.sysprocesses
WHERE 
    dbid > 0
GROUP BY 
    dbid, loginame
And this gives the total:
SELECT 
    COUNT(dbid) as TotalConnections
FROM
    sys.sysprocesses
WHERE 
    dbid > 0
If you need more detail, run:
sp_who2 'Active'
Note: The SQL Server account used needs the 'sysadmin' role (otherwise it will just show a single row and a count of 1 as the result)

Source from: http://stackoverflow.com/questions/216007/how-to-determine-total-number-of-open-active-connections-in-ms-sql-server-2005